ADS
Have you ever admired those flawless manicures from salon advertisements and wondered how you could achieve the same look without spending a fortune? The truth is, Nail Art Secrets are not reserved for professionals alone. With the right approach, quality tools, and insider techniques, you can create stunning salon-quality designs right from your bathroom counter in under 30 minutes.
Gathering Your Essential Nail Art Toolkit
Every professional nail artist knows that the foundation of a perfect manicure lies in having the right tools within arm’s reach. Before diving into any design, take a moment to organize your workspace and ensure you have everything needed for a smooth creative process.
Your essential toolkit should include a quality base coat to protect your natural nails and ensure polish adhesion, along with your chosen polish colors. Invest in dotting tools, which are inexpensive and allow you to create perfect dots, flowers, and intricate patterns. Fine-tip brushes are invaluable for creating detailed lines and French tips, while a good pair of tweezers helps place stickers and gems with precision. Don’t forget a quick-dry top coat that seals your design and adds that signature salon shine.
Must-Have Tools for Quick Designs
- Base coat and quick-dry top coat
- At least 3-4 polish colors for versatility
- Dotting tools in various sizes
- Fine-tip brush for details
- Toothpicks for fine lines and dots
- Cotton pads and nail polish remover for corrections
Having these tools organized and ready before you begin saves precious minutes and prevents the frustration of searching for supplies mid-design. A clean, well-lit workspace also contributes significantly to the accuracy of your work.
Preparing Your Nails Like a Pro
The difference between a manicure that looks amateur and one that rivals salon results often comes down to proper preparation. This step is non-negotiable if you want your designs to last and look polished.
Start by removing any old polish and gently pushing back your cuticles using a wooden orange stick. File your nails to your desired shape, whether that’s almond, square, or stiletto. The key is ensuring all nails are uniform in shape, as uneven edges immediately detract from the professional appearance. Buff the surface of each nail gently to create a smooth canvas that helps polish adhere better and prevents chipping.
After shaping and buffing, wash your hands thoroughly to remove any oils or debris. Apply a thin layer of base coat and allow it to dry completely. This protective layer not only prevents staining but also creates the smooth foundation that makes your final design pop. Taking these preparation steps seriously typically takes about 5-7 minutes but makes an enormous difference in the final result.
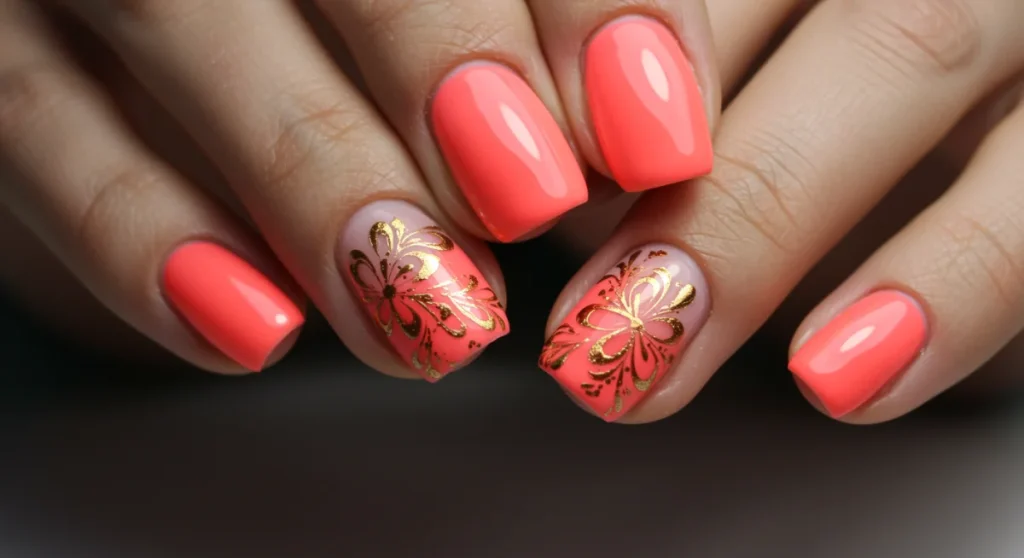
Mastering Three Quick Designs Under 15 Minutes
The beauty of home nail art lies in discovering designs that look impressive but don’t require hours of intricate work. These three designs can be completed in 5 minutes each, giving you plenty of time to perfect your technique within the 30-minute window.
The gradient ombre effect remains one of the most sought-after salon looks, and achieving it at home is simpler than you might think. Apply your lightest color as a base and let it dry completely. Using a makeup sponge, apply the darker color to one end and dab it gently onto the nail, blending the colors where they meet. The sponge absorbs excess polish, leaving behind a smooth gradient transition that looks professionally done.
Simple Dotting Patterns
- Classic polka dots: Alternate two colors in random or organized patterns
- Flower clusters: Five dots arranged in a circle with a center dot
- Geometric patterns: Create triangles or diamonds using dots of varying sizes
- French tip dots: A row of dots along the free edge for a playful twist
For the French tip style without the precision required for traditional French manicures, try the reverse technique. Apply your base color and let it dry completely. Using a fine brush or striping tape, create a curved line near the tip of your nail. Fill the space below the line with your tip color, then remove the tape or clean up edges for a flawless curved French tip that looks completely professional.
Insider Secrets for a Flawless Finish
Professional nail artists possess knowledge that takes years to develop, but several key secrets can instantly elevate your home manicures to salon quality. Understanding these techniques transforms your results dramatically.
Temperature matters more than most people realize. Cold polish applies smoothly and reduces the likelihood of bubbles forming. If you’ve just stored your polish in the fridge, let it warm slightly before using, as cold polish becomes thick and streaky. Conversely, polish that’s too warm tends to be thin and runny, making precise application difficult.
Thin coats are your best friend when aiming for a professional finish. Apply polish in two or three thin layers rather than one thick coat. Thick coats take longer to dry, tend to bubble, and often peel or chip prematurely. Between each layer, wait two minutes and seal the edges by running the brush along the free edge of the nail. This technique, called capping, extends the life of your manicure significantly.
Professional Finishing Techniques
- Seal edges with each layer to prevent chipping
- Apply top coat while polish is slightly tacky for best adhesion
- Use a quick-dry top coat spray for instant setting
- Clean up mistakes with polish remover on a small brush before top coating
- Keep top coat in the refrigerator for a cooler, smoother finish
One often-overlooked secret is the importance of cleaning up the edges of your manicure after completing your design but before applying the top coat. Use a small brush dipped in polish remover to clean up any polish that got on your skin or cuticles. This simple step creates that crisp, professional appearance that distinguishes salon-quality work from amateur attempts.
Avoiding Common Mistakes That Ruin Results
Learning what not to do proves equally important as mastering techniques. Many home nail artists unknowingly make mistakes that undermine their efforts, resulting in chipped, bubbling, or uneven manicures that don’t last.
Shaking your polish bottles creates bubbles that transfer to your nails and ruin the smooth finish. Instead, roll the bottle between your palms for about 30 seconds to mix the color without introducing air. Similarly, blowing on your wet polish or using a fan can cause texture and bubbles. Patience is essential—allow each layer to dry naturally rather than rushing the process.
Another common mistake involves applying top coat too thickly or too soon. Top coat should be applied in thin, even layers over completely dry polish. Applying it over tacky polish causes dragging and ruins your design. Similarly, waiting too long between layers can cause the polish to dry too much, preventing proper adhesion between layers.
Skipping the base coat is perhaps the most damaging mistake. Base coat provides adhesion, prevents staining, and creates the smooth foundation your design needs. Without it, polish chips within days and can leave unsightly yellow stains on your natural nails. Investing in a quality base coat protects your nails and extends the life of your manicure.
Extending Your Salon Look for Days
Creating a beautiful design is only half the battle—making it last ensures your effort pays off for as long as possible. With proper aftercare, your home nail art can look fresh for seven to ten days, matching or exceeding salon durability.
Wait at least two hours after completing your manicure before exposing your nails to water or engaging in activities that might cause damage. This waiting period allows all layers to cure fully. When doing dishes or cleaning, wear rubber gloves to protect your manicure from hot water and harsh chemicals that break down polish quickly.
Aftercare Tips for Long-Lasting Results
- Apply a thin layer of top coat every two days to refresh shine and protection
- Moisturize cuticles daily without getting product on the nail surface
- Avoid using your nails as tools to open packages or scrape surfaces
- Keep cuticle oil handy and apply before bed for healthy nails
- Touch up chips immediately with remaining polish and top coat
When you notice chips forming, address them immediately rather than waiting for the manicure to degrade completely. Touch up the chip with a small amount of the base color, followed by a thin layer of top coat. This quick fix extends the life of your manicure significantly and keeps it looking fresh until you’re ready for a new design.
Building Confidence Through Practice
Like any skill, nail art improves dramatically with practice. Don’t become discouraged if your first attempts don’t match salon results—every professional started exactly where you are now. The key is approaching each manicure as a learning opportunity and celebrating incremental improvements.
Begin with simpler designs and gradually increase complexity as your steady hand develops. Document your work with photos to track progress and identify areas needing improvement. Watching tutorial videos and studying professional nail artists’ techniques provides inspiration and new approaches to try. Most importantly, enjoy the creative process and the satisfaction of wearing nail art you created entirely by hand.
Building a collection of colors and tools takes time, but you don’t need everything at once. Start with a basic set and add supplies as you discover preferences and techniques that work for your personal style. The journey of becoming skilled at nail art is as rewarding as the beautiful results you’ll eventually achieve.
| Key Point | Brief Description |
|---|---|
| Essential Tools | Quality base coat, top coat, dotting tools, fine brushes, and 3-4 polish colors create the foundation for professional designs. |
| Proper Preparation | Clean, shaped nails with pushed cuticles and buffed surfaces ensure polish adheres smoothly and lasts longer. |
| Thin Layers | Applying multiple thin coats instead of thick ones prevents bubbles, reduces drying time, and creates a smoother finish. |
| Edge Sealing | Running brush along the free edge with each coat seals polish and prevents premature chipping for extended wear. |
Frequently Asked Questions
Yes, absolutely. With proper preparation, the right tools, and practiced techniques, most simple designs can be completed in 15-25 minutes. The key is starting with well-prepped nails and using thin, even coats of polish. Simple designs like dots, gradients, and French tips are particularly achievable within this timeframe.
Bubbling usually occurs from shaking the polish bottle or applying thick coats. Roll bottles between your palms instead of shaking them, and always apply thin layers. Peeling often happens when polish is applied over oily nails or when the base coat is skipped entirely. Ensure proper nail preparation and always use a quality base coat.